APR 02 , 2017 , Fox River Valley .
We decided to upgrade a Mac Pro 4,1 ( 5,1 flashed ) running MacOS Sierra with some inexpensive older drive parts lying around the shop and we were very pleased with the results . With modern faster and higher capacity drives , a truly awesome internally mounted array can be built .
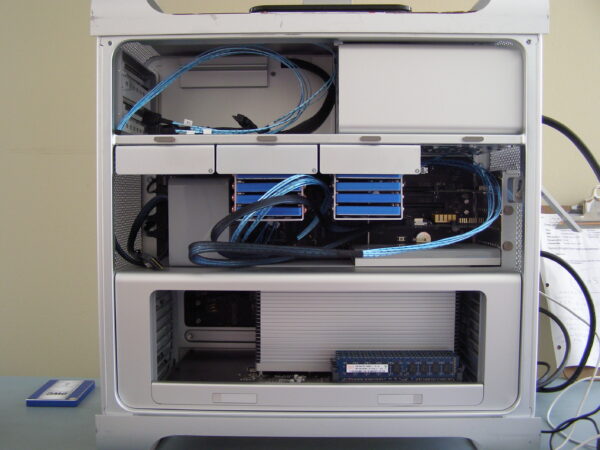
Using a set of eight ancient 60GB ( 480 GB Total ) 3G 2.5” SATA SSDs internally mounted in the Bays of the Mac using custom made carriers connected to a Highpoint 6G RAID PCIe card we achieved 1700 – 1900 MB/s throughput with a RAID 0 ( striped ) array . That's fast enough to write a 4K RAW video project onto . Using modern 6G drives should nearly double that performance , minus some overhead . This internal array should be future upgradable as high as 8 x 4TB ( 32 TB total ) capacity . Considering that the largest internal drive a Cylinder Mac Pro 6,1 ( 2013 ) comes from the factory with is just 1 TB , this array project is quite significant .
The Highpoint card can be EFI flashed in order to boot macOS , so the drive array can be used as the Mac's sole storage device . Highpoint provides the downloadable files and instructions for the card we used and we can verify that it works .
Creation Machines recommends , however , that serious media editing workstations have multiple drive subsystems with a dedicated solid state boot device . Another solid state drive installed for cache , scratch , plugins , etc . And a drive array fast enough to write the desired workflow without latency . We've had stellar feedback from our clients with this approach and a traditional desktop workstation is the only machine capable of providing the necessary bandwidth .
Caution : Building one of these high end internally mounted RAID arrays requires a qualified technician , so inexperienced individuals should not attempt a project like this to avoid damaging components if the array is not wired correctly . It requires the use of IDT / IDC methods performed manually , so the installer needs to hand make the necessary custom DC power cabling flawlessly . If you are not experienced with these methods , you should hire a local qualified technician to build a project like this . Also , do not use HDDs with this array project , as they consume more power than solid state devices . We did not test the array with HDDs .
Here's a list of parts and tools needed :
1 ) Any classic Mac Pro 1,1 – 5,1 ( 2006 – 12 ) , although you might prefer a model ( 2008 – 12 ) with at least one PCIe 2.0 slot .
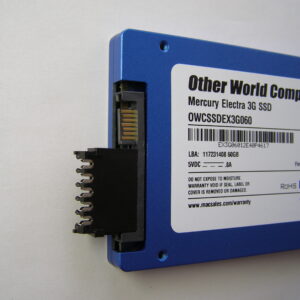
2 ) 8 x matching 2.5” SATA 3G or 6G SSDs . $ variable . We paid $160 for our eight OWC 60GB SSDs , NOS .
3 ) 2 x NewerTech ( OWC ) Adaptadrives , $14.25 each available here .
4 ) 2 x Dyconn Four 2.5” drive 2.5” to 3.5” adapter mounting brackets , $7.00 each available here .
5 ) 32 x M3 x 8mm drive mounting screws . These came with the Dyconn brackets above . Red fiber washers necessary .
6 ) A supply of red motherboard fiber washers ( optional ) . 50 washers for $4.75 available here .
7 ) 1 x 15 g bottle of rubberized superglue ( Gorilla Glue ) . $4.65 available here .
8 ) 8 x Molex SATA Power Connector IDT Type ( model 0679260015 ) . 8 for $6.16 plus shipping , available here .
9 ) 6 x Molex Conn Cover 5POS IDT Feed Thru ( model 67926-0041 ) . 6 for $1.62 plus shipping , available here .
10 ) 2 x Molex Conn Cover 5POS IDT Feed To ( model 67926-0040 ) . 2 for $0.54 plus shipping , available here .
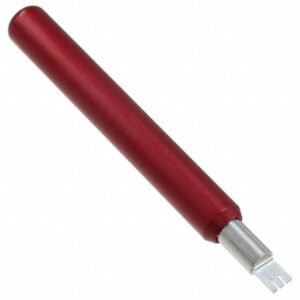
11 ) 1 x Molex Manual IDT Insertion Tool ( model 0638133503 ) . $32.40 each , available here .
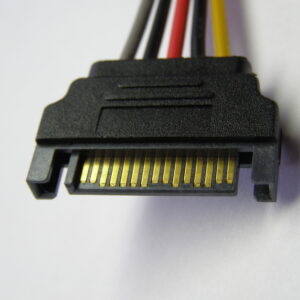
12 ) 2 x 12” 15 Pin SATA Power 18 AWG Extension Cables . 3 for $8.99 plus shipping , available here .
13 ) 1 x Highpoint RocketRAID 2720SGL PCIe card . $170 , available here .
14 ) 2 x Mini-SAS SFF-8087 to 4 x SATA Forward Breakout Cable ( Cable Matters model 104016 , 0.5 or 1 m length choice ) . $13.99 each , available here 0.5 m and here 1 m .
15 ) SoftRAID Lite ( OWC ) - RAID Utility Software ( for RAID 0 and 1 ) . $37.50 , available here .
16 ) SoftRAID 5.5 ( OWC ) - RAID Utility Software ( for RAID 0, 1, 4, 5, 1+0 ) . $172.75 , available here .
17 ) Intech SpeedTools - Benchmarking Suite . $7.50 , available here .
18 ) Z-SERIES #1 X-ACTO knife . $4.69 , available here .
The total cost of our 480 GB project was around $430 , because some of our parts were used .
Installation procedure :
IMPORTANT REMINDERS : always follow ESD safety procedures when working with static sensitive components . Make certain the power cord of the workstation is unplugged when adding or removing components or performing repairs .
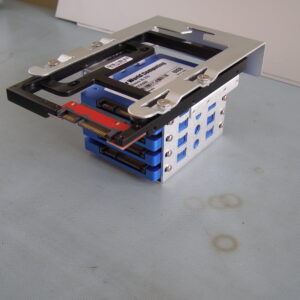
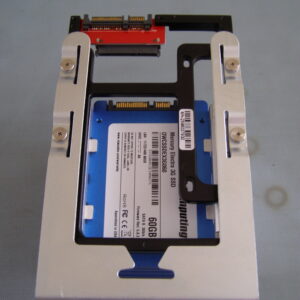
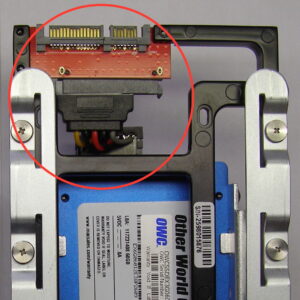
1 ) Install one Adaptadrive onto one of your Mac Pro's HDD Carrier , using screws included in the package . Do not glue . Make certain the Adaptadrive's gold connectors are facing upward when the Carrier is re-installed into its Bay .
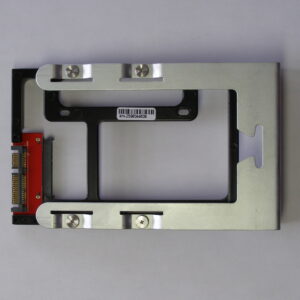
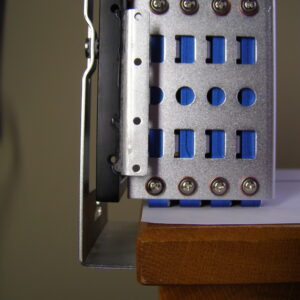
2 ) Verify that each of the four drive slots will firmly fit a SSD in one adapter mounting bracket . The bracket should be made of aluminum and can be bent by hand slightly if too narrow or wide .
3 ) Position the open side of the adapter mounting bracket upon the end of the Adaptadrive closest to the handle of the HDD Carrier . Make certain there is enough clearance for fingers between the bracket and the handle to make the modified HDD Carrier easy to remove from its Bay .
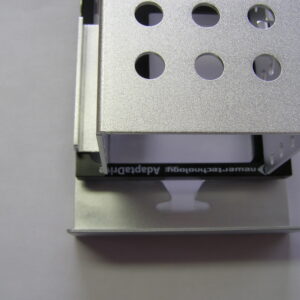
4 ) Superglue the entire lengths of the seams of both sides where the Adaptadrive and the bracket touch . Do not glue areas that are not exposed to air , as superglue requires the moisture in air to cure . Proper curing takes between 12 – 24 hours .
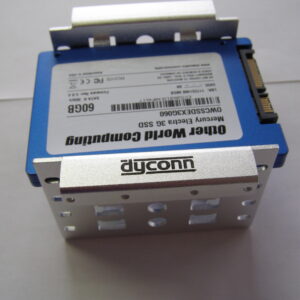
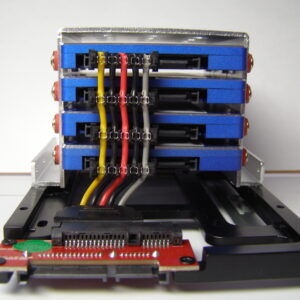
5 ) Attach your four SSDs to the bracket's slots using the M3 screws . Use the red fiber washers for a secure attachment , if necessary . Make certain the gold connectors of your drives are facing upwards when the Carrier is re-installed in the Bay and are also closest to the socket of the Adaptadrive .
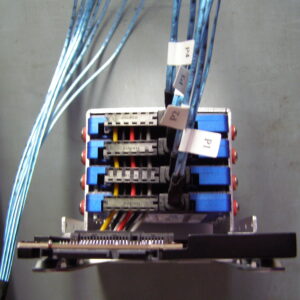
6 ) Attach an IDT SATA Power Connector to each of the four SSD's power connector .
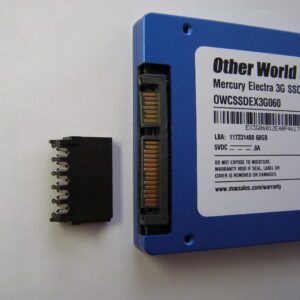
7 ) Remove the extra piece of plastic on the male connector end of the 12” 15 Pin SATA Power Extension Cable so that it will firmly attach to the inner power connector of the Adaptadrive . Attach the Cable's male connector to the Adaptadrive's female power connector . Superglue the top and bottom seams of this connection as well to prevent separation during use . Let cure .

8 ) Position the 12” 15 Pin SATA Power Extension Cable over the four SSDs . Measure the cable so that it touches the IDT connectors of all four drives . Cut away the excess length of Cable with a Z-SERIES #1 X-ACTO knife . The zirconium nitride coating of its blade will effortlessly cut through the Cable wires . You'll be discarding the female connector end of the Cable .
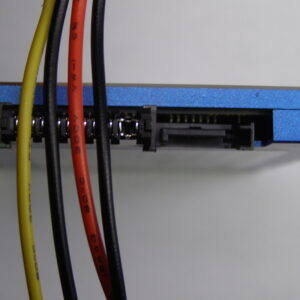
9 ) Align the individual wires of the Power Cable onto all the slots of the IDT SATA Power Connectors . ( Outer side of 15 pin SATA power connector ) - 12 V Yellow – Ground Black – 5 V Red – Ground Black – 3.3 V Grey , not utilized - ( Inner side of 15 pin SATA power connector ) ( 7 pin SATA Data connector ) . Confucius say , don't get the wire placement confused .
10 ) Place the rears of the four SSDs against a hard , unmovable surface and let hang the handle of the Carrier over the surface edge .
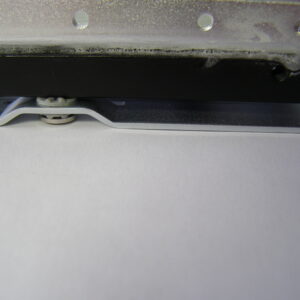
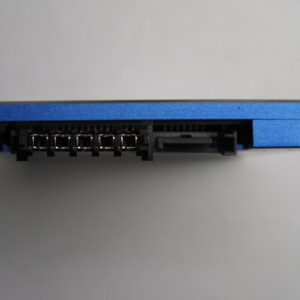
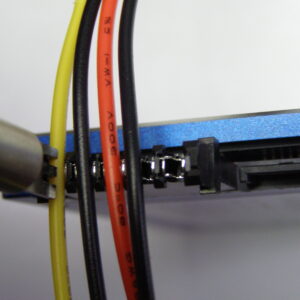
11 ) Ready for showtime now and here is where the operation gets tricky . For those readers with network installation experience this is not hard . For newbies , it might prove catastrophic . So be careful ! You might want to practice on some cheap cables , first . If so , remember to buy some extra IDT connectors , as well , as they are fragile and should not be re-used . Using the Molex Manual IDT Insertion Tool , press down while wiggling longitudinally upon the first power wire into the appropriate slot of the first IDT connector . Do this for all five wires of the drive closest to the Adaptadrive . The slots of the IDT connectors will cut the wires automatically to provide an electrical connection . Verify each wire has been properly inserted . If not enough force is used , a shallow termination will occur and there might be an insufficient or loose connection . If too much force is used , the wire will get squished , become damaged under its insulation and not provide a proper termination . Do not use a screwdriver or other common object for this operation , to avoid damage . Use only a professional installation tool . Keep the wires as straight as possible . The pictures below show how to install a SATA power wire into the IDT connector ; in this case the cable only has four wires . We only inserted the yellow 12 V wire for demonstration purposes .
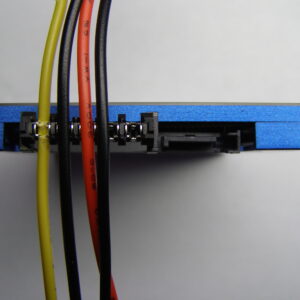

12 ) Repeat installation of the power wires into the IDT connector of the next drive and continue in sequence until all four drives have their IDT connectors attached with all the wires of the Power Cable . Again , keep the wires as straight as possible . This will reduce cable snagging once the modified HDD Carrier has been installed in your Mac .
13 ) Do a final visual inspection of all the wires installed in all the slots of all the IDT connectors ( whew ! ) of the modified HDD Carrier to verify proper termination . All 20 wire connections per Carrier . Generally , if the colored insulation of the wire is pressing against the bottom of the slot of the IDT connection , you have a solid installation . See illustration for guidance .

14 ) You are now ready to install the modified HDD Carrier into one of the Bays of the Mac Pro to verify a physical connection . Unplug the power cord of your Mac . Remove side access panel of your Mac . Bay 2 is the preferred bay to install the first modified HDD Carrier as this bay will not likely interfere with an installed peripheral card in PCIe Slots 2 , 3 or 4 of your Mac Pro . For the second modified HDD Carrier , use bay 3 , but use caution as this might interfere with longer and wider peripheral cards installed in those same PCIe slots . There should be no concern with installing even a full length and double width card in PCIe slot 1 , no matter how many modified HDD Carriers are installed .
Repeat the above steps to build the second modified HDD Carrier with four SSDs .
15 ) Remove all the modified HDD Carriers from your Mac . Install the Highpoint RocketRAID 2720SGL PCIe card . We recommend PCIe Slot 2 for Mac Pro 4,1 and 5,1 models .
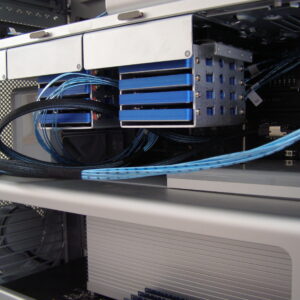
16 ) Connect the two Mini-SAS Cables to the RocketRAID card's SFF-8087 connectors . Make certain the latches of the cables snap in place securely . Verify connections by tugging gently on the cables .
17 ) Attach the four SATA data connectors of one Mini-SAS Cable to the four SSD data connectors of one modified HDD Carrier . These cable connections will not latch to the drives , so don't worry . Just verify the connections are firm by tugging on each SATA data cable gently , as well . Install the modified HDD Carrier into your bay choice . Repeat this operation for the second Mini-SAS Cable and second modified HDD Carrier . Be careful the numerous individual SATA data cables do not become pinched between the Mac's backplane board connectors and the modified HDD Carriers during installation of the latter .
18 ) Verify no cable touches the blades of any fan inside your Mac . Use cable ties and tape for safe cable management , if necessary . With all upgraded components , use the shortest cables possible .
19 ) Restore the side access panel of your Mac . Attach the power cord of your Mac . The physical portion of building the array should now be complete .
20 ) Turn on your Mac . The Highpoint 2720SGL has native driver support in Mac OS X 10.8.x and later . And the card can be used with Mac OS X 10.6 and 10.7 with drivers available from Highpoint here . This card now has the ability to have its ROM flashed with EFI , so that it can be bootable with Mac OS . Directions and software are available in a file from Highpoint here . A Mac OS web manager program is also available for this card, from Highpoint here . You might need it if the card alarm sounds .
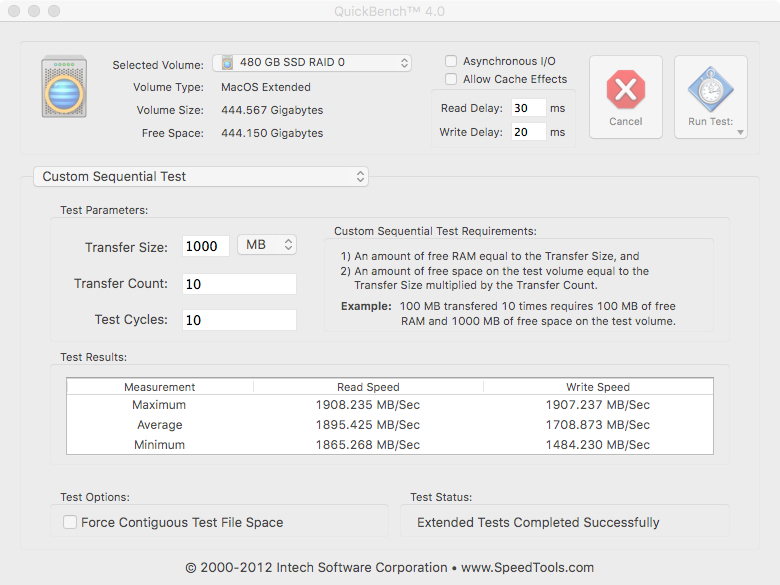
21 ) Use MacOS Disk Utility or SoftRAID to build a RAID 0 of your eight SSDs . Verify array sequential performance with a program like Intech's QuickBench .
Performance results :
As stated above , we achieved a sequential throughput of between 1700 - 1900 MB/s with a set of ancient 3G solid state drives . Due to the lack of available macOS utilities , we are not able to measure the IOPS or latency of the array . We could do so within Windows and Linux , but that's cheating . This is a Mac OS performance test .
Some additional thoughts :
1 ) The use of 6G drives should nearly double throughput results . We only had 3G drives available at time of test .
2 ) Drives up to 4 TB individual capacity should be compatible . The array should scale up to a total capacity of 32 TB ( 8 x 4 TB ) .
3 ) Even very high capacity individual non-enterprise SATA SSDs should consume no more than 5 W during heavy usage . For example , a Samsung 2TB 850 Pro will consume no more than 3.4 W of power . A single four drive modified HDD Carrier thus will not consume more than 20 W of power . The Mac's backplane it is connected to is capable of providing at least 33 W of power and two backplanes concurrently can provide at least 66 W . This has been confirmed in our GPGPU builds with these Systems . Still , it would be prudent to verify the power consumption of the individual drives you intend to install in this type of array . Some enterprise SATA SSDs guzzle juice .
4 ) SATA SSDs tend to remain cool under sustained active conditions and will not experience thermal throttling compared to other interface types of solid state drives (such as M.2 drives ) . So the use of older type drives has yet another significant advantage .
5 ) It should not be difficult to install a total of 16 individual SATA SSDs in a classic Mac Pro with the appropriate single 6G mini-SAS RAID card ( requires at least four internal connectors ) or two 2720SGL Cards . It has been reported PCIe Slots 3 and 4 of Mac Pro 4,1 and 5,1 workstations share limited bandwidth resources , so choose interface slots carefully . An additional eight 2.5" SATA SSDs can be installed in the Optical Disk Drive compartment using the factory SATA power connectors and IDT / IDC wiring . The total capacity of this 16 SSD array should be as high as 64 TB ( 16 x 4 TB ) . The chassis of the Mac Pro would need to be modified so that the RAID card's mini-SAS data cabling can snake into the ODD compartment . Observant readers will notice in the project photographs one mini-SAS breakout cable has already been installed there in our test bench cMP , which has such modification through the temporary removal of the ODD door assembly .
6 ) The choice of 2.5" SATA SSDs for your array depends upon your budget and risk tolerance for drive failure . The best choice of drives would be enterprise grade , like Intel S3700 or S3710 series . These are data center drives with impressive endurance ratings around 10 times that of consumer drives . Consumer drives might have impressive term periods (e.g. 5 - 10 years ) with their warranties , but usually have severe TBW limits that could be reached within a single month of heavy use (e.g. high end video editing ) . New enterprise gear typically is extremely expensive , so quality used drives are a consideration . Properly re-certified used enterprise grade drives in a conservative RAID 10 array is probably the most economical long term choice available for most power users .
7 ) The RAID 0 ( stripe ) array used in this project is fast , but fragile . The loss of a single drive destroys the array . A much more conservative choice would be a RAID 10 array , which is a stripe ( RAID 0 ) of two mirrored ( RAID 1 ) arrays . Write performance would suffer , though , using the same number of individual drives .
8 ) Mac Pro 1,1 ( 2006 ) , 2,1 ( 2007 ) workstations have PCIe version 1.x slots , which provide bandwidth of 250 MB/s per lane . Mac Pro 4,1 ( 2009 ) and 5,1 ( 2010-12 ) have PCIe version 2.0 slots , which provide bandwidth of 500 MB/s per lane . The Mac Pro 3,1 ( 2008 ) has a mixture of both versions of PCIe slots . For best results , install the Highpoint RocketRAID 2720SGL PCIe card in a version 2.0 slot that has 8 or more electrical lanes .